|

 About the author: Paul Diamond Blow is a musician, spoken word artist, punk rock star, kung fu master, and part time Space Commander living in Seattle, Washington. Blow is a frequent contributor to the Seattle Sinner magazine and performs regularly in the Pacific Northwest rock club circuit. His book Tales From Outer Space is out now. More Paul Diamond Blow links: Paul Diamond Blow website Paul Diamond Blow music on CDbaby Paul Diamond Blow on iTunes 
Insult jokes and gags Related articles: How to Open an Indesign CS5 Document With Indesign CS3 Indesign CS5 Slow and Buggy? How to Speed it Up How to Merge Multiple Indesign Layouts into a Single File Indesign Tips: How to Apply Faux Bold and Italic Formatting to Text How to Convert Quark Xpress Documents to Indesign Paul Diamond Blow's "Huggy Talk" articles are copyright (c) 2010 Paul Diamond Blow Webmaster: Cornelius Zephyr privacy policy |
PHOTOSHOP TUTORIAL: How to color comic book line art in Photoshop Need to color your B&W comic book art or other illustrations, for print or just for the web? Here's how the pros do it using Photoshop... by Paul Diamond Blow
Coloring the line art: The easiest way to color in Photoshop is to first select the area you want to color using the "magic wand" tool. The tolerance should be set on 40 and the "anti-aliased", "continuous" and "use all layers" boxes should all be checked in the Magic Wand tool settings. In my Ape comic, I'm going to color the sun first. I chose a nice reddish color in the color palette, clicked inside the sun with the magic wand tool, and that white area inside the sun is now selected. NEXT IMPORTANT STEP after selecting an area to color is to EXPAND the selection by 3 pixels ("Select / Modify / expand"). This will ensure give you some color trapping which is important for printing. It's easiest to create a Photoshop "action" that will expand by 3 pixels, then you just play that action after you select each area to color. In my sun there was a tiny gap in the line art, so my original selection actually selected more than just the sun. In cases where there are gaps in the line art you need to fill in those gaps ON THE COLOR LAYER with the color you will be applying to that area (NOT black!) After you've got the area you want to color selected with the magic wand tool, have expanded the selection by 3 pixels, and have chosen a color value in your Color palette, simply fill in that area ("Edit / Fill") with the foreground color. Now that I've colored the sun, I will color a few other easy-to-color items using the same method: the woman's blonde hair (100Y), her lips (100M 100Y) and the ape's rifle 90C 60M 90Y). Once again, I had to fill in a few tiny gaps in the line work so that the Magic Wand only selected the areas I wanted selected, and often times you will find that after filling in the selected area with your color some bits may not have been colored due to the nature of the line art. In that case, simply use the brush tool to fill in any little details that didn't get colored. Make sure you are on the "color" layer when filling in the colors, you do NOT want to add any color to the "line art" or "rich black' layers -- if you did, you messed up! (See figure 3; my ape file with a few items colored) 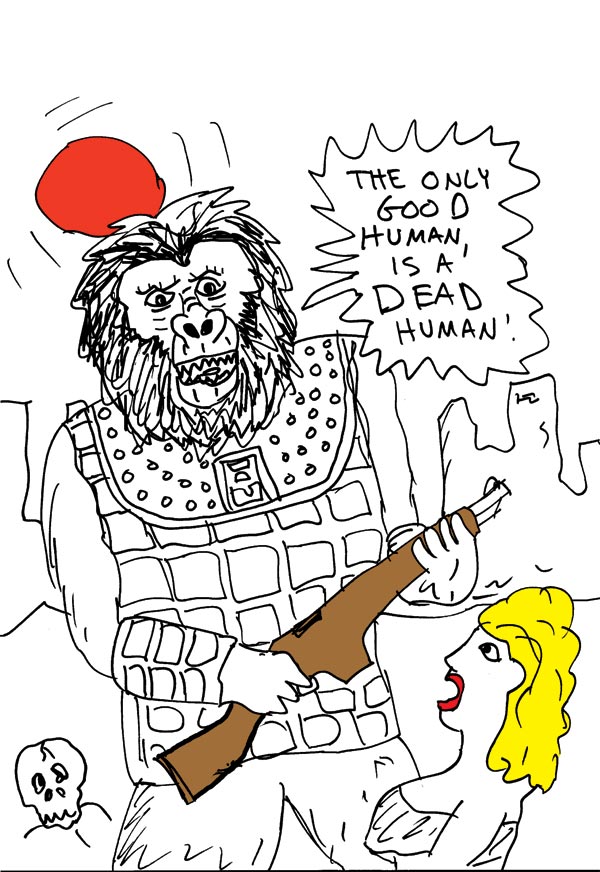
Figure 3:Here's my ape with a few items colored Here's a tip about selecting you colors when coloring: try to avoid putting any black into your color mixes if possible, use only the Cyan, Magenta, and Yellow channels. You can achieve dark colors without using any black, but if you do need to add black to the color mix you should keep the percentage below 50%, or in your final file the actual black line art will be hard to make out when stacked over the color file in your page layout. |